


How to Lay Paving Stones on a Concrete Base – Step-by-Step Instructions
Laying paving stones on concrete is a reliable way to create a surface that can withstand heavy loads and remain perfectly level. This method is especially suitable for full-sawn granite paving stones or when heavy vehicles are expected.
Advantages of a concrete base:
Before choosing the type of foundation, it is important to decide which paving stones are best to use for your project ↗.
Steps for laying paving stones on concrete:
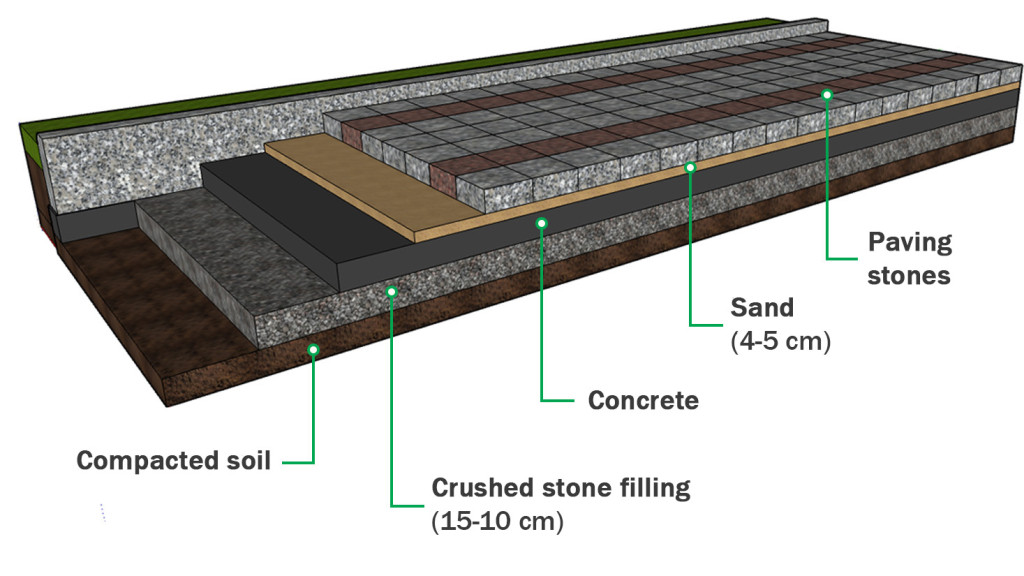
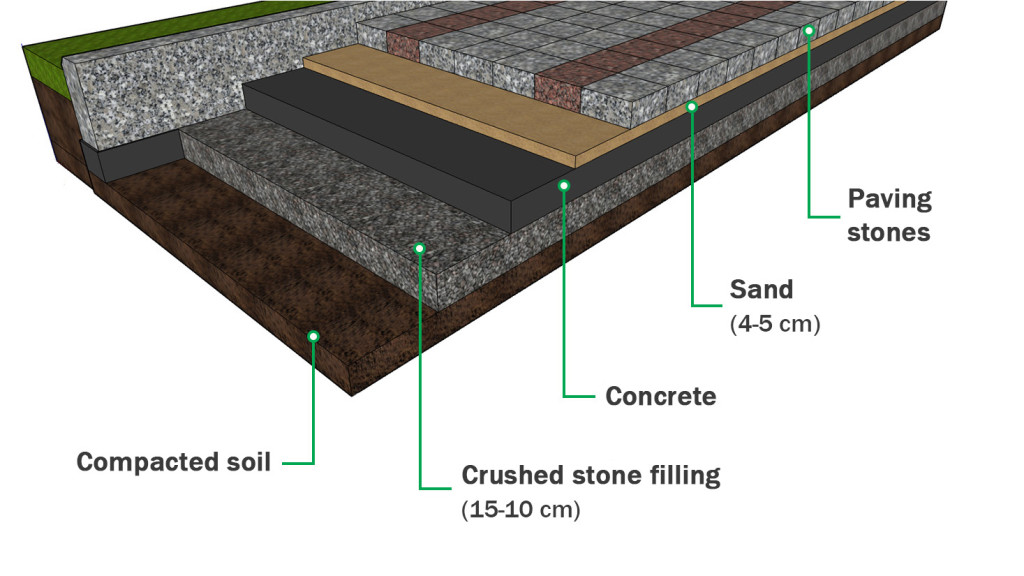


1. Base preparation
- Remove the topsoil to a depth of 25–30 cm;
- Add and compact 10–15 cm of gravel for drainage;
- If necessary, install formwork (wooden boards around the perimeter);
- Install reinforcing mesh or a rod frame (especially if high loads are expected).
Pouring the concrete base
- Pour concrete 10 to 15 cm thick;
- Add a slope of 1–2 cm per meter in the direction of water drainage;
- Allow the concrete to cure for at least 7 days until it gains strength.
📌 For the base under paving stones, it is recommended to use concrete no lower than grade M200–M300, preferably with frost resistance F100–F200 and water resistance of at least W4.
Concrete layer
- For passenger vehicles – 10 cm of concrete
- For heavy vehicles – 15–20 cm
- For weak soils – add a layer of geotextile.
3. Laying paving stones on a dry cement-sand mixture (CSM)
- After the concrete has dried, spread a dry mixture of cement and sand (1:3 ratio);
- Evenly distribute the CSM on the surface to a thickness of 3–4 cm;
- Lay the paving stones, gently “pressing” them into the dry mixture with a rubber mallet;
- After laying, slightly moisten the surface to activate the cement and allow the stones to bond.
4. Joint filling
- Additionally fill the joints with dry CSM or sand;
- You can use polymer sand for better resistance to weeds and washing out.
⚠️ Consider the following:
For large areas, you need:
- Linear drainage (drainage channels, trenches, perforated pipes);
- Expansion joints in concrete every 3–5 meters. Fill them with sealant or sand-cement mix.
If laying paving stones near house walls – do not block foundation ventilation openings.
Disadvantages of laying paving stones on concrete
Despite the strength and reliability of laying paving stones on concrete, this method has its drawbacks which should be considered before starting:
For objects with lower traffic intensity, you can consider paving on a classic base. For more details, see our article on general advice on laying paving stones in a cement-sand mixture ↗.
📌 When this method is justified:
Examples of available formats can be viewed in our granite paving stone catalogue ↗.